
The WordPress favicon is the finishing touch for your website. In this tutorial, I’ll show you how to add a favicon to your WordPress site. A favicon is a little icon that appears on the browser tab and in bookmark lists. It doesn’t take much time to set up a site icon, and it can help your site stand out! Especially in mobile search results.
You can create your favicon yourself using any image editor, but if you don’t want to go through the trouble, here are some little tricks to make it a lot simpler
This tutorial will help you regardless of your theme. So it doesn’t matter which theme you use. Further down in the article you will also find additional tips on how to add a favicon to WordPress themes like Divi and Astra.
What is a Favicon?
A favicon (short for “favorite icon”) is a tiny graphical element used to distinguish a WordPress website from other bookmarks. A favicon is 16px x 16px and is displayed in the URL and bookmarks bar in the browser.
Favicons are rectangular images that are placed on your website for the browser. The desired image can have a completely filled or a transparent background.

Since the release of WordPress 4.3, it is possible to add “favicons” to your website.
The trick is to create a WordPress favicon where it’s instantly recognizable that it links to your website, without taking up system resources at the same time. That’s what we’ll cover in this detailed guide.
Why Should You Add a WordPress Favicon to Your Site?
While favicons aren’t going to do any “heavy lifting” when it comes to search engine optimization, it’s hard to imagine anyone building a WordPress website without making this little icon a major priority.
That’s because your favicon is basically your “WordPress fingerprint”. It lets people identify your bookmark at a glance, adds more brand congruency, and increases the odds that visitors are going to interact with your site, too.
Built properly, a favicon can add quite a bit of style to your site – but it’s also going to help you with your branding and your visibility.
Creating a Favicon in WordPress
Even though favicons are tiny (16 pixels by 16 pixels isn’t a lot of real estate), you have to be really deliberate in how you create them.
This isn’t something that you should approach “willy-nilly”. It’s something that you really want to think through, something that you want to smash out of the park.
For starters, think about how you’re going to use the space you have available. Small, simple, but visually arresting favicons are much more effective than those that try to cram too much into this compact footprint.
Simplicity is a big piece of the puzzle, too. Really try to get a big part of your branding element across in this bit of space and you’ll have to take care of most of the heavy lifting.
Building Tools for Favicons
Building favicons in the “dark ages” of WordPress development (even just a handful of years ago) had to be done by hand.
Today, nothing could be further from the truth.
Now there are a whole bunch of tools available to help you shortcut the favicon development process.
We’re not just talking about tools like Photoshop, GIMP, and the like, either.
Favicon generators (like the Real Favicon Generator) allow you to transform a 260 x 260 pixel picture – a JPEG, PNG, or SVG – into a properly scaled favicon ready to rock and roll.
are just some of the other tools out there on the market today to help you hit the ground running with your new favicon design.
The right size for your favicon
As highlighted a moment ago, you really are limited to just 16 pixels by 16 pixels when it comes to the available real estate you have to work with for your favicon.
Anything larger than that and your imagery isn’t going to display correctly. Any smaller than that, though, and your favicon could scale incorrectly – or it could stay shrunken down and you wouldn’t be taking full advantage of every pixel of available space.
When you’re designing your favicon really try to think about the size restrictions. This is a tiny little icon. The detail doesn’t have to be off the charts – but it does have to be immediately recognizable as your WordPress fingerprint.
4 Ways to Add a Favicon to Your WordPress Site
After your favicon has been built it’s time to run through the process of actually getting that favicon up on your WordPress installation and in the bookmark bars of all of your visitors.
Here’s a quick rundown of four popular ways to add favicons to your WordPress site with as little headache and as little hassle as humanly possible.
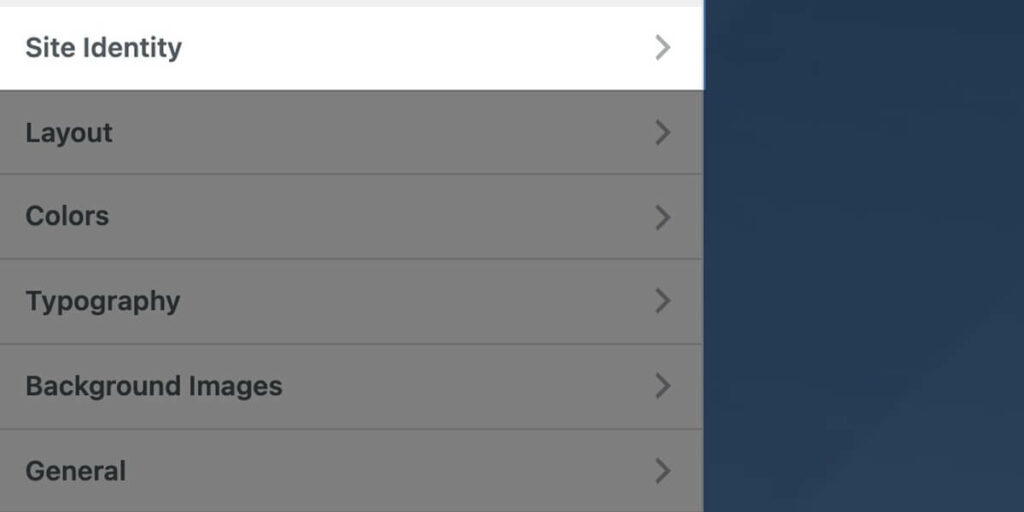
Option 1: Using the WordPress Customizer
The WordPress Customizer (found in the APPEARANCE – CUSTOMIZE settings of your WordPress administrative backend) lets you create a great favicon in record time, and have it uploaded into the correct position as well.
This is the fastest method for getting a favicon on your site, hands down.
Start with a 512 x 512 pixel that you want to use as your favicon image. That helps you avoid having to convert the actual image into the .ICO format.
Run through the WordPress Customizer in your administrative backend, select the file you want to use under the SITE IDENTITY section, and then upload the actual image.
Click save and then publish and you are good to go!
Option 2: Using Plugins
There are a couple of different plug-ins you can use to knock this project out of the park, too.
The Favicon Rotator plug-in makes uploading and adding a favicon to your WordPress installation a breeze. You can even add multiple favicons in a rotating library and have this plug-in swap them out every time someone loads up your site.
All in One favicon is another great plug-in for WordPress users. It streamlines the process quite a bit, though it’s not nearly as fast as using the WordPress Customizer.
Still, it’s nice to have options!
Option 3: Manual Installation via FTP Client
Of course, you can also manually add a favicon to your WordPress installation through an FTP client.
All you really have to do is upload the image that you want to use as your favicon to the root directory of your WordPress installation.
Change the name of that file (after it’s been uploaded) to “favicon.ICO” and you’re good to go.
Option 4: Uploading the Favicon Through Your Theme’s Options Page
Some themes in WordPress let you add a favicon through the theme options page in your administrative dashboard.
To find out if the theme you’re using has this functionality, simply log into your admin panel, go to your WordPress theme options page, and see if they have an option to upload your new favicon.
If they do, simply use that tool to upload the file and get your new favicon rocking and rolling on your site from here on out.
The Best Favicon Generator Plugins for WordPress
As far as top-tier favicon generator plug-ins are concerned, you really can’t go wrong with the following options:
- Fresh Favicon (Works with every browser under the sun)
- TWI (Does a lot more than just favicon management)
- Real Favicon Generator (Simple, straightforward, and elegant solution for favicons)
… And that’s just the tip of the iceberg!
Both Heroic Favicon Generator and the Very Simple Favicon Manager plug-ins deserve an honorable mention, too.
How to Change the Favicon in WordPress Astra Theme
Changing the favicon in the WordPress Astra theme is simply a matter of running through these quick steps:
First, prepare the image file that you want to use as a favicon. Make sure it’s 512 x 512 pixels.
Log into your administrative backend and then navigate to the APPEARANCE – CUSTOMIZE section. Now go to the HEADER – SITE IDENTITY section.
Click on the SELECT IMAGE at SITE ICON section of this backend and choose the image you want to use as your new favicon.
That’s it, you are good to go!
How to Change the Favicon in Divi theme
Changing out the favicon in the Divi WordPress theme is pretty easy, too.
You’ll want to use the THEME CUSTOMIZER built into your WordPress backend.
First, log into your administrative dashboard and then go into the Divi Theme Options section of the platform.
Navigate to the THEME CUSTOMIZER – GENERAL SETTINGS – SITE IDENTITY part of the theme options. Click on the SITE ICON or APPEARANCE settings to find the favicon image upload option.
Now you’ll need to select the favicon you want to use. Just make sure that it’s 512 x 512 pixels and in the ICO, PNG, or JPG file format.
Upload the imagery and let the magic of WordPress handle the rest of the heavy lifting for you. Click on the PUBLISH button at the very bottom of this page and your new favicon will be live!