

By default, WordPress offers pages and posts to publish your content. Especially for static content like service offers you are more likely to use a page. But what if you want to create a subpage of an existing page? In this short tutorial I explain how you can create a subpage of an existing page.
Further below, I’ll give you some more important tips to keep in mind when creating the subpage.
This is how you create a subpage in WordPress:
1. Go to the Pages menu item in the Admin Dashboard
Once you have logged into the WordPress dashboard, you will find the menu item “Pages” on the right side of the large main menu. Click on this menu item or select “Add new” directly from the submenu.
2. Create a new subpage
Now you create your new page, which will later be used as a subpage. You don’t have to pay attention to anything, but can create the page exactly as you always do.
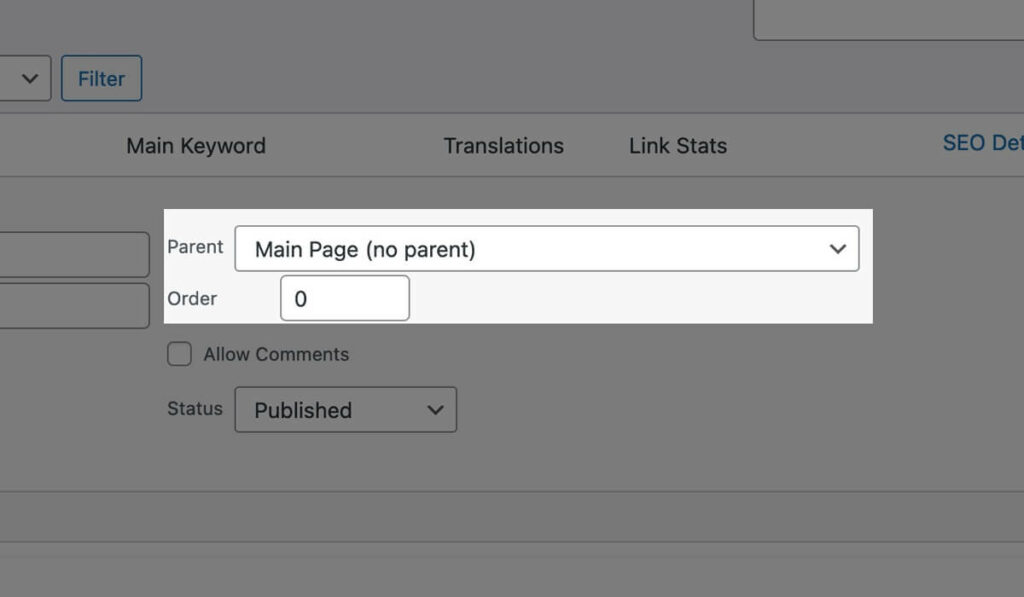
3. Open the page attributes on the right side
Once you’ve completed the content for your new subpage, take a look at the right-hand edit menu for your page. You’ll probably have to scroll down a bit, but one of the tabs there is named “Page Attributes“. This is the area where you tell WordPress whether you want your new page to be a main page, or a subpage of an existing page.

Tip:
Often the “Page Attributes” section is collapsed. You can expand and collapse all settings on the right side. Just click on the word “Page Attributes” to expand the section.
Also, you may not see the settings in the current view. If you look to the top of the right page, you will see that WordPress also works with horizontal tabs here. Just click on the tab “Page” to open all settings.
4. Select the parent page
If you have opened the “Page Attributes“, you will already find a text field with the name “Parent Page”. This field is dynamic. This means that you start by entering the name of your desired main page.
WordPress already provides you with pages from your website that might fit as you type.
Select the page you want to subordinate your new page to.
Tip:
If you have already created other subpages, you can use the “Order” field to specify the position at which your subpage should appear. However, this has no effect on the position in your menu.
5. Publish your subpage
After you have finished your page and made all settings, you can publish the page. It will now be recognized by WordPress as a subpage of a parent page.
How to turn an existing page into a subpage
Sometimes it can happen that you already have an existing page that now needs to be turned into a subpage.
To do this, you can simply follow the steps above, or make your life easier.
Just select the menu item “Pages” to get an overview of all existing pages.
Then find the page you want to be a subpage and click on the small menu item named “Quick Edit“.
A new editing area will open where you will see a dropdown box on the right labeled “Parents“.
There you can now select the parent page and then click on the blue “Update” button at the bottom right.
Your page will now automatically become a subpage.
Tip:
If you subsequently make a page into a subpage, the permalink, i.e. the URL of the page, changes. To ensure that the search engine and your visitors can still find the page, you should create a redirect from the old URL to the new one.
This is especially easy with the plugin “Redirection” that you can find for free in the WordPress plugin directory.